Project Document – Cloud Storage Integration Documentation
Introduction
The Project Document feature allows a primary working document to be attached to every project and stored on the firm's connected cloud storage provider (Microsoft SharePoint / Outlook or Google Workspace). Once configured, the document is created or linked at the time of project registration, can be edited directly from the project view, shared with internal users and client contacts through Manage Access, and sent for electronic signature through DocuSign.
This document covers the complete flow, from enabling the integration in App Settings to managing the signature lifecycle from the Signed Documents page.
Prerequisites
Before the Project Document section becomes available during project registration, two configurations must be completed in App Settings → Integrations:
- Connect a cloud storage provider (Microsoft Outlook / SharePoint or Google Workspace)
- Enable the Project module under Cloud Storage Modules
Both steps are performed by a system administrator.
Step 1 – Connecting the Cloud Storage Provider and Docusign
- Navigate to the Settings section by clicking the settings icon in the header bar
- Under the Common Master section, click on App Settings
- Open the Integrations tab
The Integrations tab lists all available third-party services as individual cards. Each card displays:
- Provider name and description
- Connection status (Connected / Not connected)
- Connection date, when connected
- Connect or Disconnect action button
Connecting Microsoft Outlook / SharePoint
- Locate the Microsoft Outlook card
- Click Connect
- Complete the Microsoft authentication and consent flow in the popup window
- On success, the status changes to Connected and the connection date is displayed
Connecting DocuSign
- Locate the DocuSign card
- Click Connect and complete the authentication flow
- Once connected, you are all set.
- You can map the default signatory if needed.
Connecting Google Workspace
- Locate the Google Workspace card
- Click Connect and complete the Google authentication flow
- Once connected, the card expands to show a service-level table with Email Send, Email Read, and Drive rows, each with its configuration values, an enable/disable toggle, and a Test Email action
- The Drive service must be enabled for project document storage
- A How to set up? link is available on the card for detailed configuration guidance
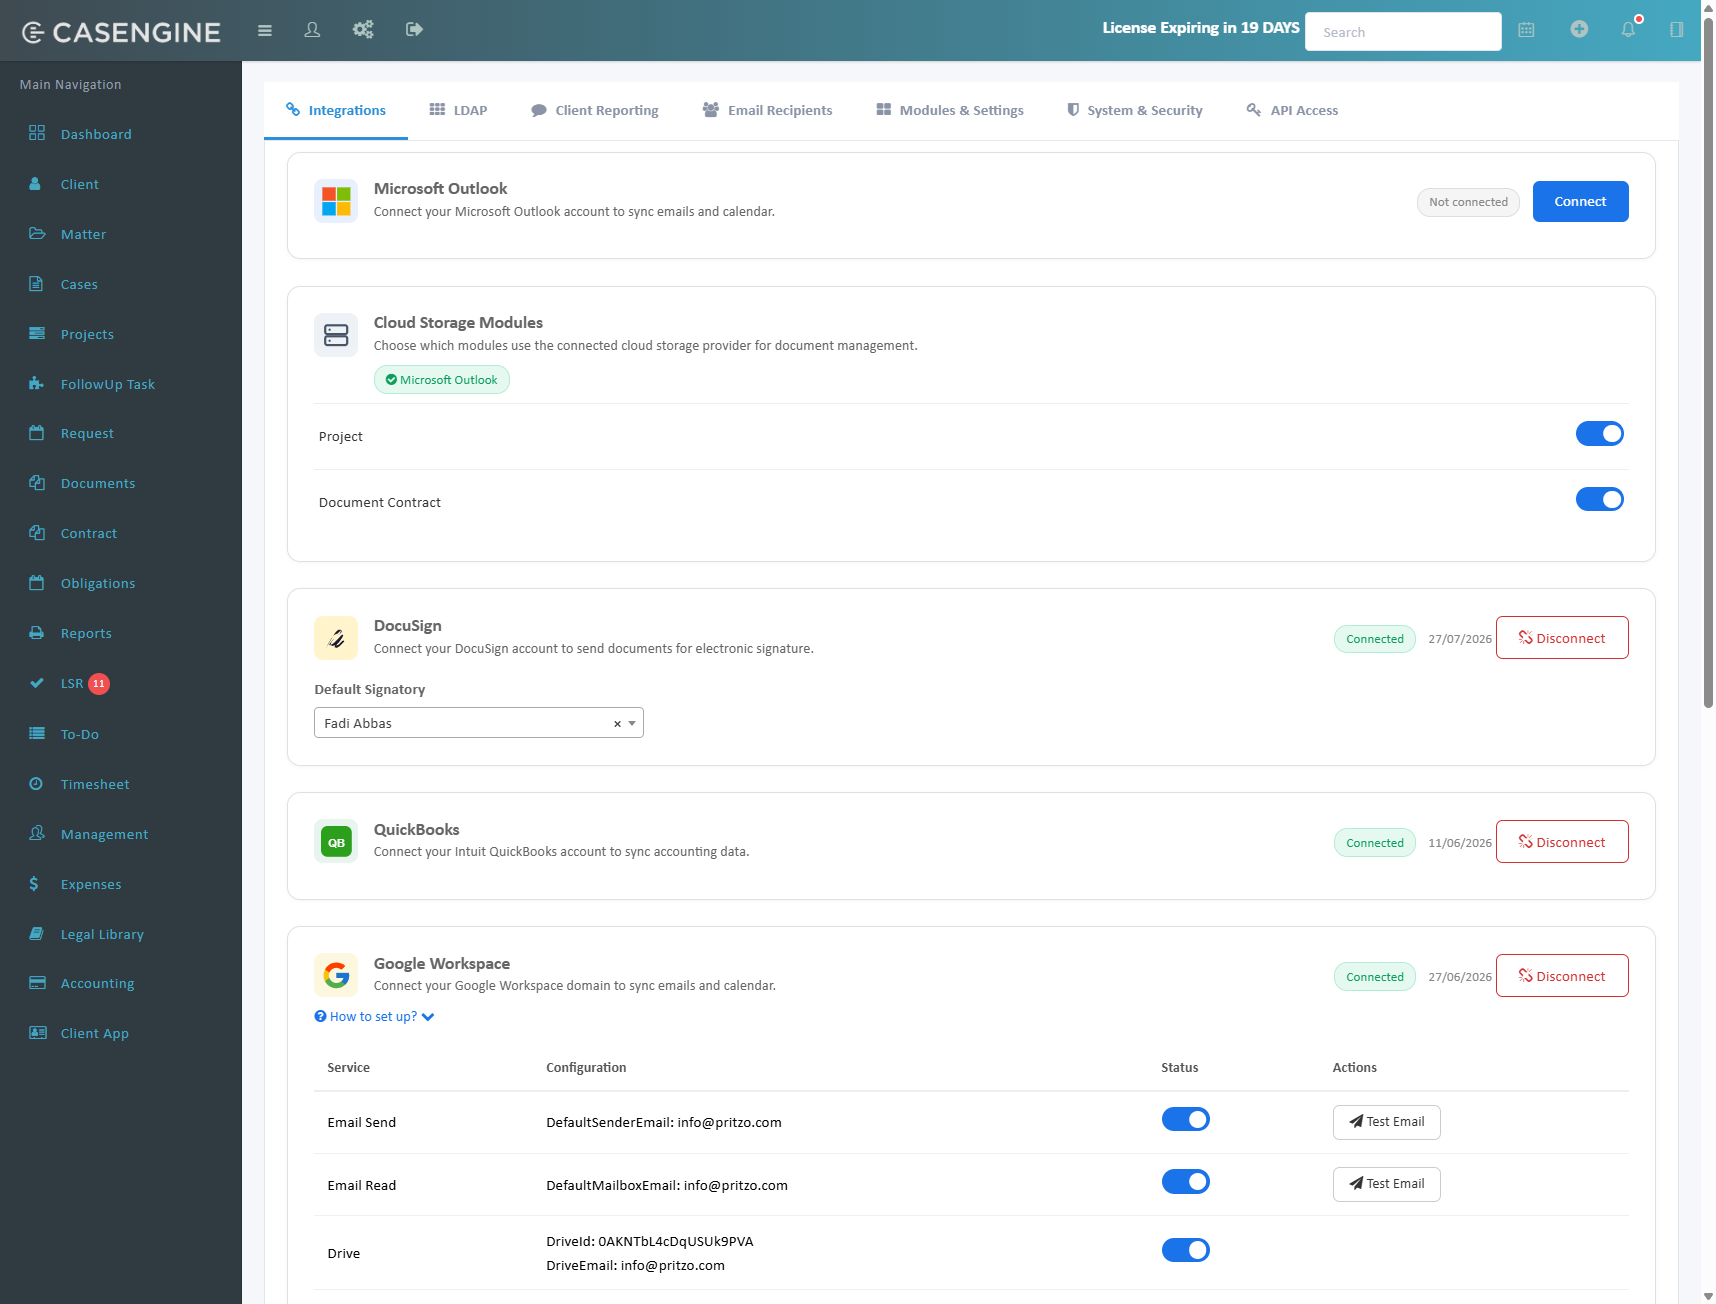
Note: Only one cloud storage provider is used for document management at a time. The active provider is displayed as a badge inside the Cloud Storage Modules card.
Step 2 – Enabling Cloud Storage for Projects
Within the same Integrations tab, locate the Cloud Storage Modules card. This card controls which modules use the connected cloud storage provider for document management.
The card displays:
- A badge showing the currently connected provider (for example, Microsoft Outlook)
- Project – toggle to enable cloud storage for the Project module
- Document Contract – toggle to enable cloud storage for the Contract module
To enable the feature for projects, switch the Project toggle on.
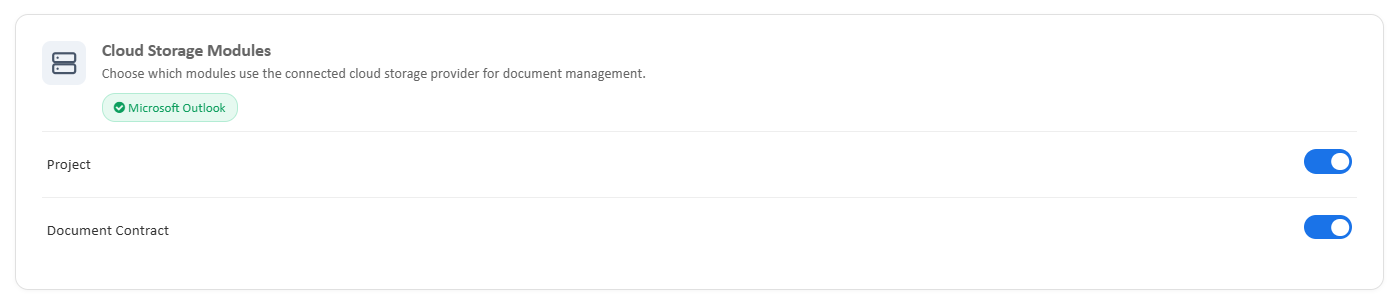
Note: If no provider is connected, the module toggles remain unavailable. The Project Document section will not appear in the project registration form until the Project toggle is enabled.
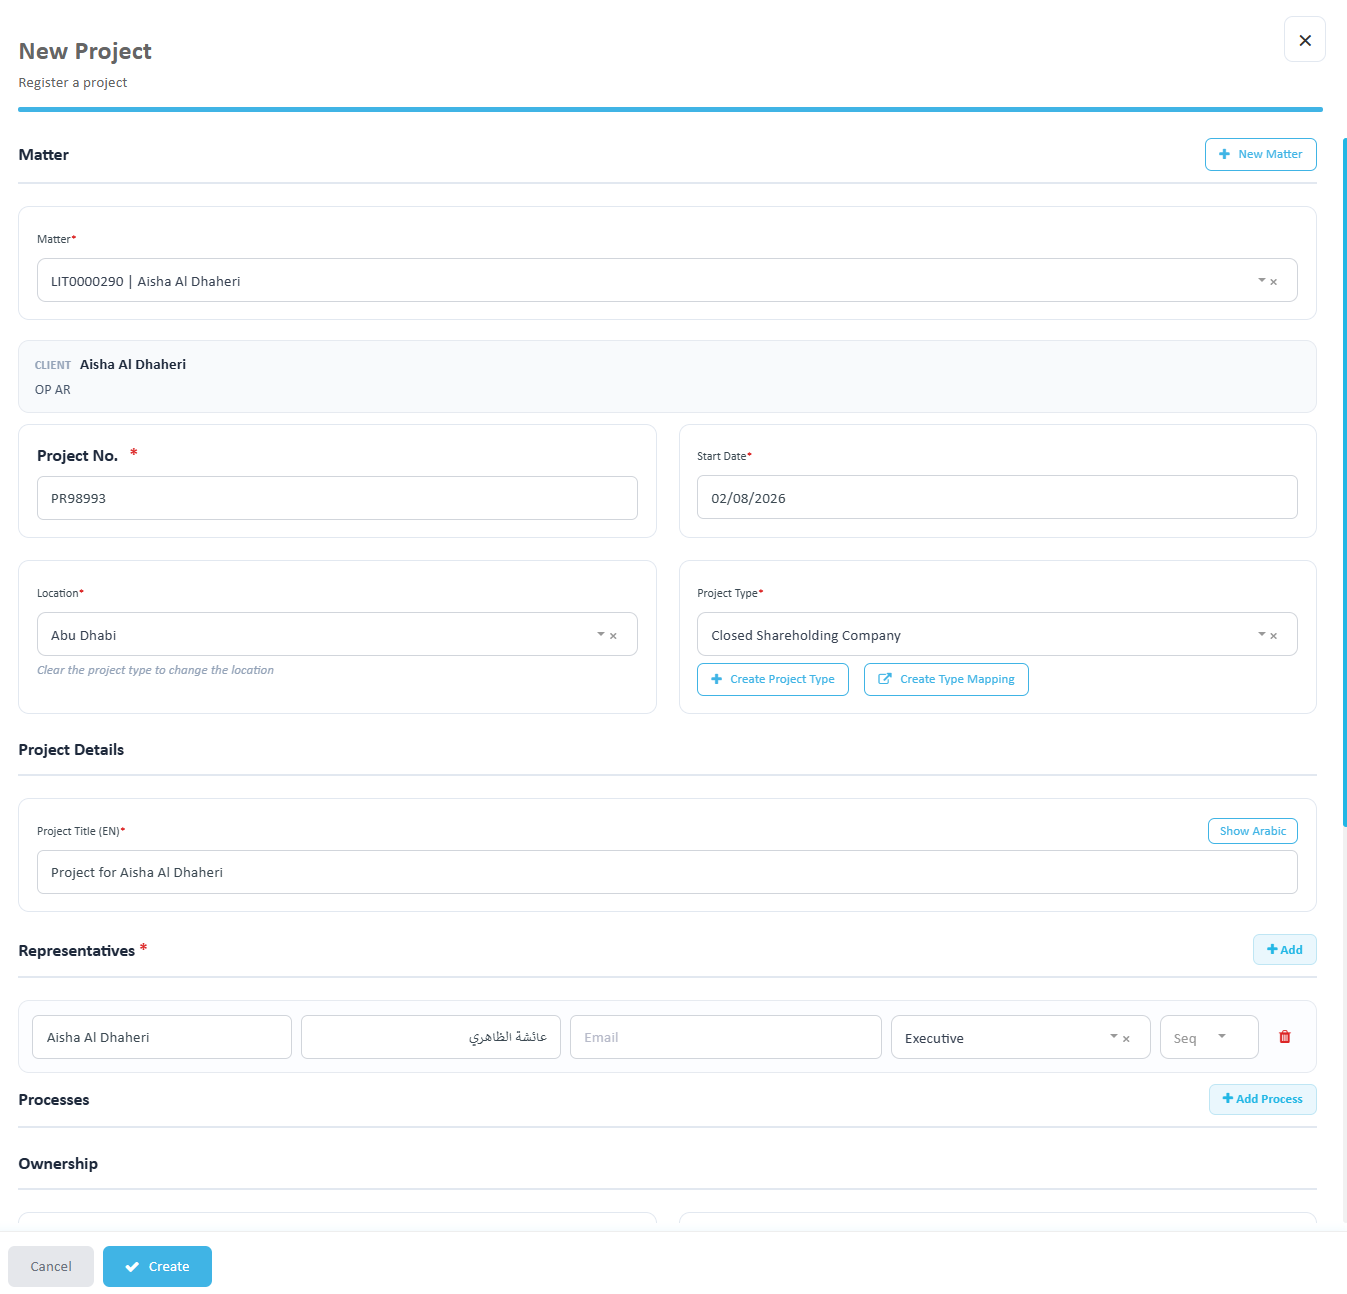
Step 3 – Adding a Document During Project Registration
Select the matter, date, location, project type. Set the representative title and responsible.
Once the integration is active, a Project Document section appears at the bottom of the New Project form, below the Notes section.
The section is labelled Optional. Choose one source for the primary project document and presents four radio card options:
| Option | Description | Behaviour |
|---|---|---|
| Upload Document | Pick a file from your computer | Uploads an existing Word file as the project document |
| Blank File | Start with an empty document | Creates a new blank Word document on the cloud storage provider |
| Link Contract | Reference an existing contract | Selects a contract already created in the Contracts module |
| Skip | Cannot be added later | No document is created for this project |
Only one option can be selected.
Upload Document
- Select Upload Document
- Click the file selector and choose the file from your computer
- Only Word files (.docx) are permitted. Any other file type is rejected with a validation message
Blank File
- Select Blank File
- A new empty Word document is generated on the connected cloud storage when the project is created
Link Contract
- Select Link Contract
- A Select Contract dropdown appears below the options
- Choose the contract from the list, displayed as Contract No. | Contract Title
- The selected contract document becomes the primary project document
Skip
- Select Skip if no document is required for this project
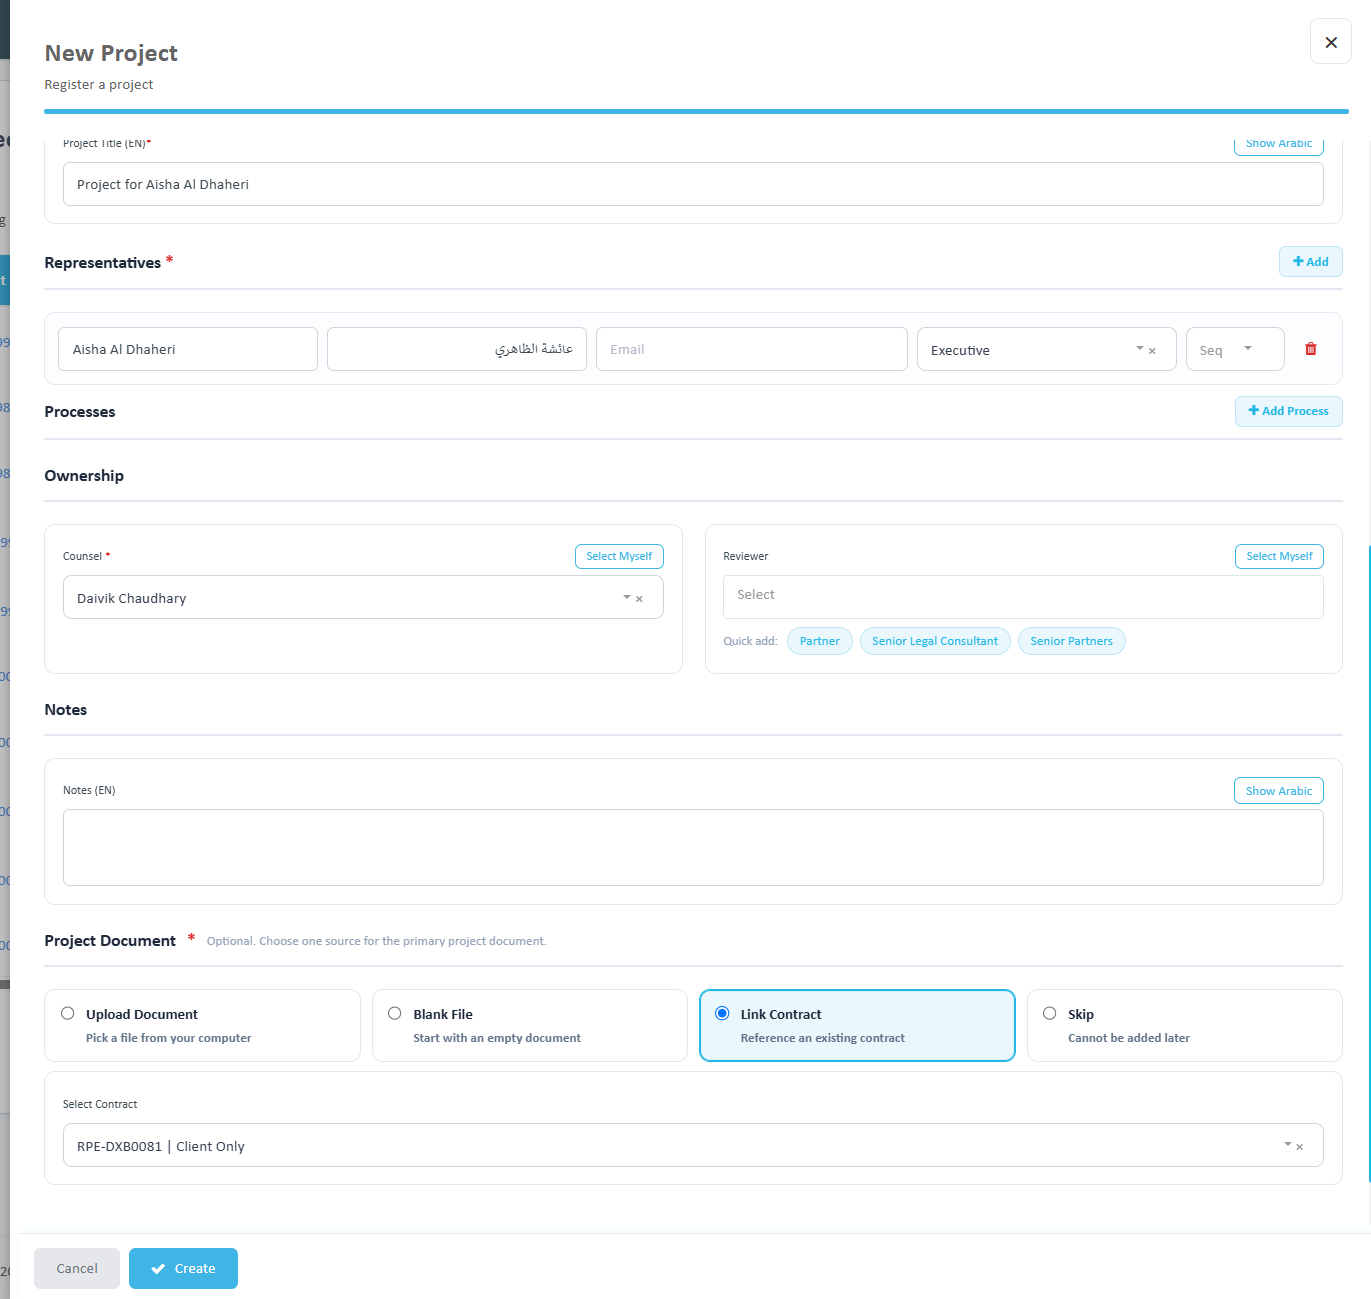
Important: If Skip is selected, a project document cannot be added later. The choice is permanent for the lifetime of the project, so confirm the requirement with the user before selecting Skip.
Click Create to complete registration. The document is created or linked on the cloud storage provider at this point.
Step 4 – Accessing the Project Document
Open the project from the Projects module. The project header displays the project title, project number, status, and the following detail line:
- Client
- Project Type
- Location
- Matter
- Project Document link, followed by the document action icons
The action icons available next to the Project Document link are:
- Share – opens the Manage Access panel
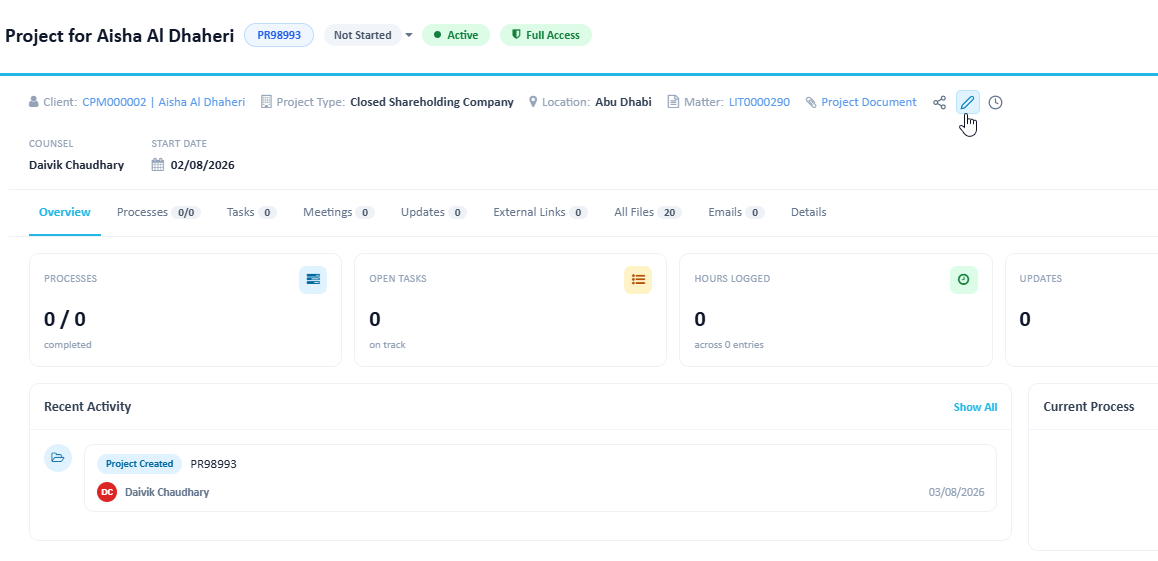
- Edit – opens the document for editing on the connected cloud storage provider
- History – displays the document version and activity history
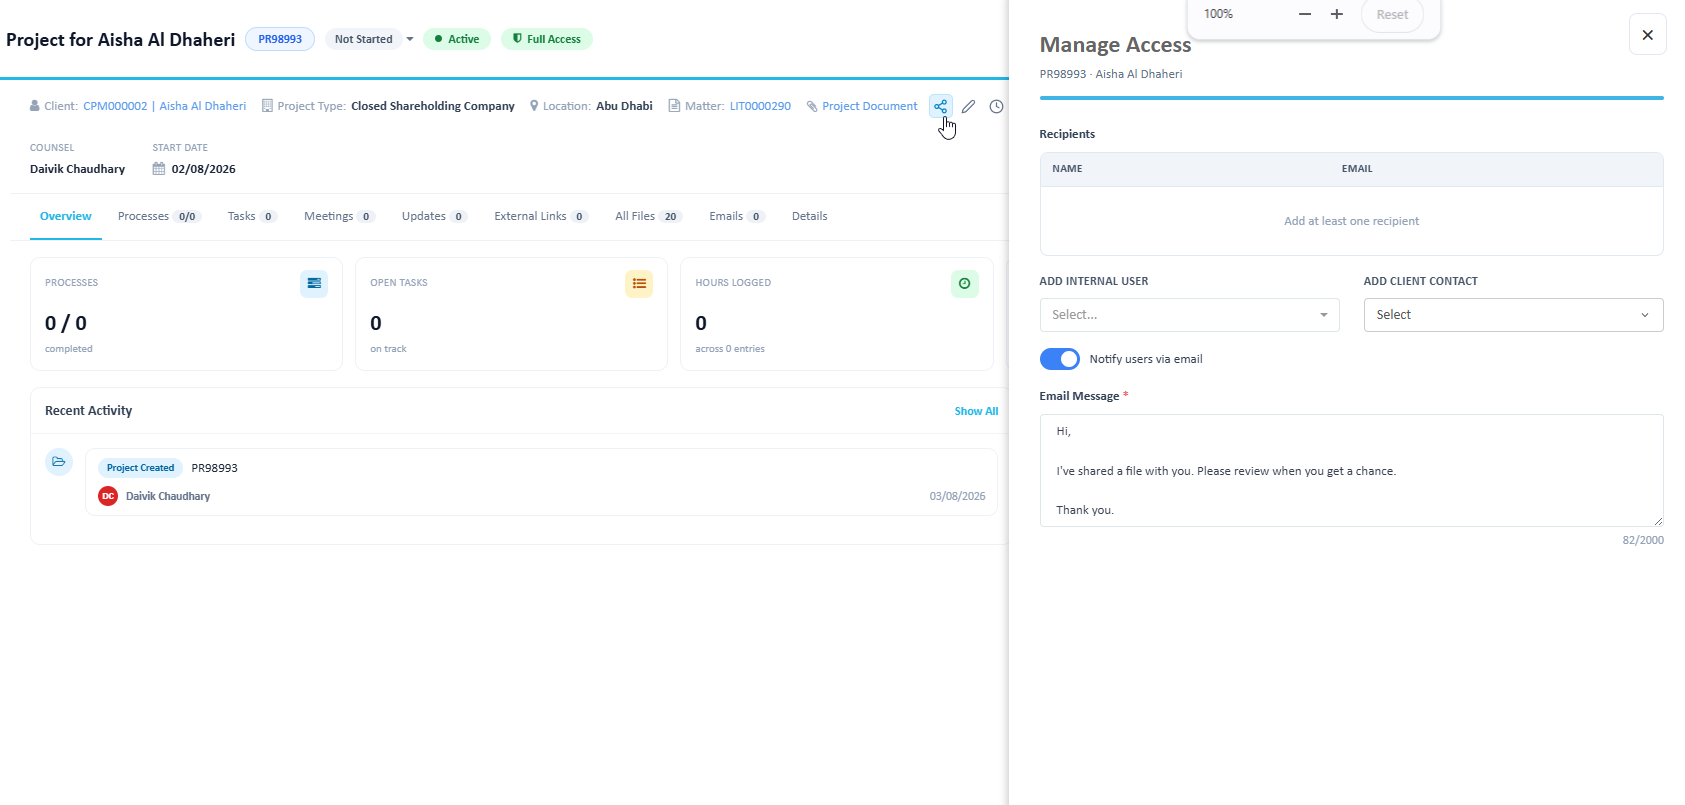
Note: These icons appear only when a document was attached during project registration. Projects created with the Skip option display no Project Document link.
Step 5 – Managing Document Access
Click the Share icon to open the Manage Access side panel. The panel header shows the project number and client name.
The panel contains:
Recipients
A grid listing all users and contacts who currently have access, with columns for Name and Email. When empty, the grid displays Add at least one recipient.
Add Internal User
A dropdown listing active system users. Select one or more users to grant them access to the document.
Add Client Contact
A dropdown listing the contacts registered against the project's client. Select the contacts who should receive access to the document externally.
Notify users via email
A toggle, enabled by default. When on, selected recipients receive an email notification with the document link.
Email Message
A mandatory text area containing a default message that can be edited before sending. The field has a 2,000 character limit with a live character counter.
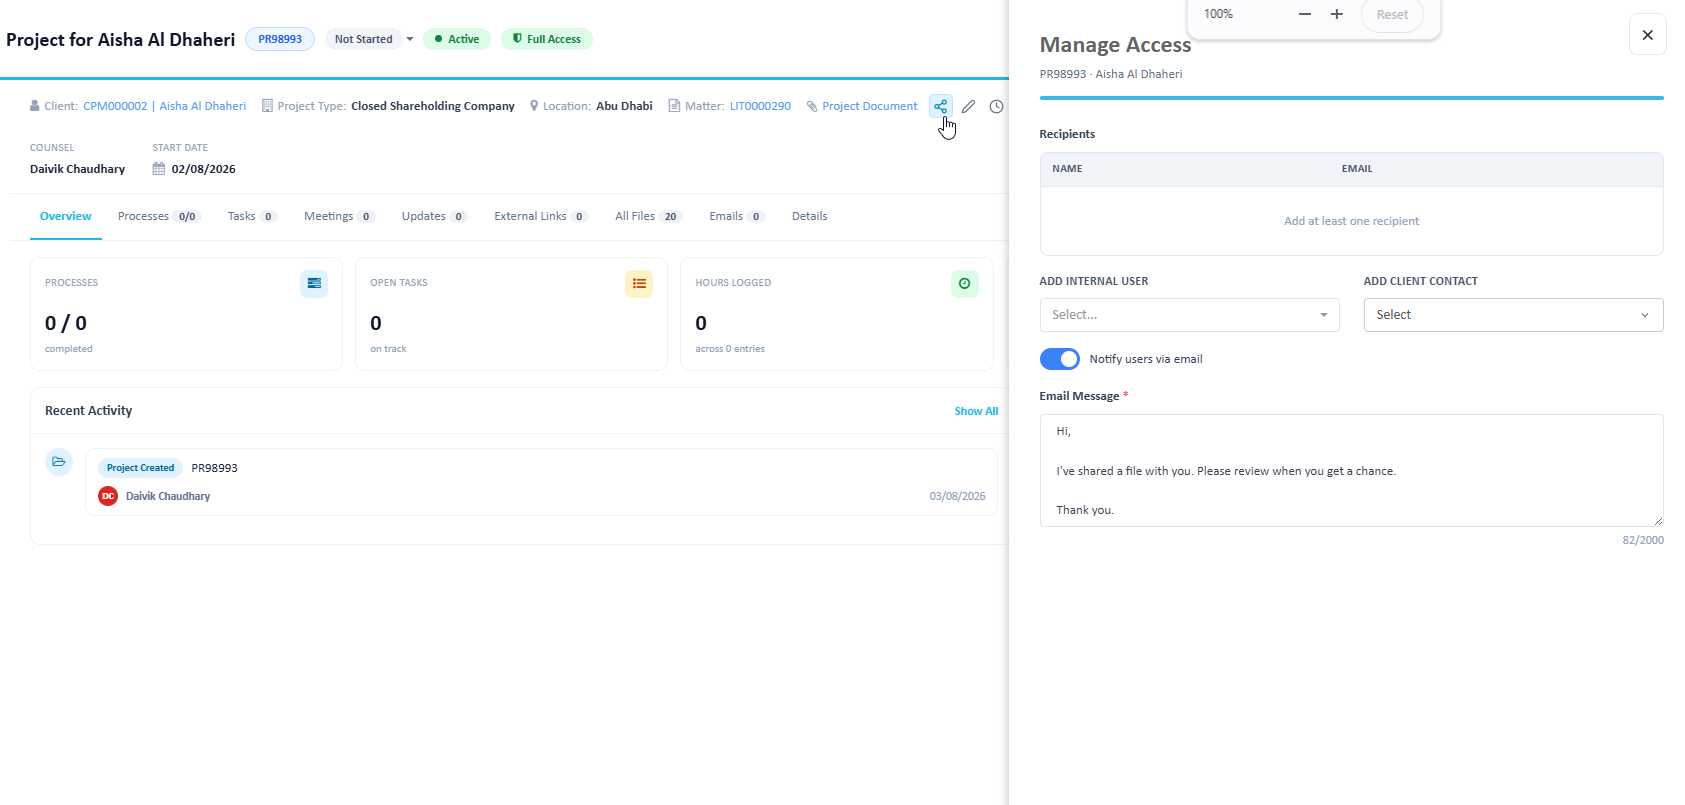
Once the recipients and message are set, submit the panel to grant access and dispatch notifications.
References:
- Internal users are drawn from the System Users master
- Client contacts are drawn from the contacts registered under the project's Client record
Step 6 – Sending the Document for Signature
Once the project document is finalised, it can be sent for electronic signature through the DocuSign integration.
Prerequisite: DocuSign must be connected in App Settings → Integrations. The DocuSign card also allows a Default Signatory to be selected, which is pre-filled when initiating a signature request.
To send the document:
- Open the project and access the project document actions
- Choose the signature option to initiate the DocuSign envelope
- Confirm the signatories and send
The document status is then tracked in the Signed Documents page.
Step 7 – Managing Signatures from Signed Documents
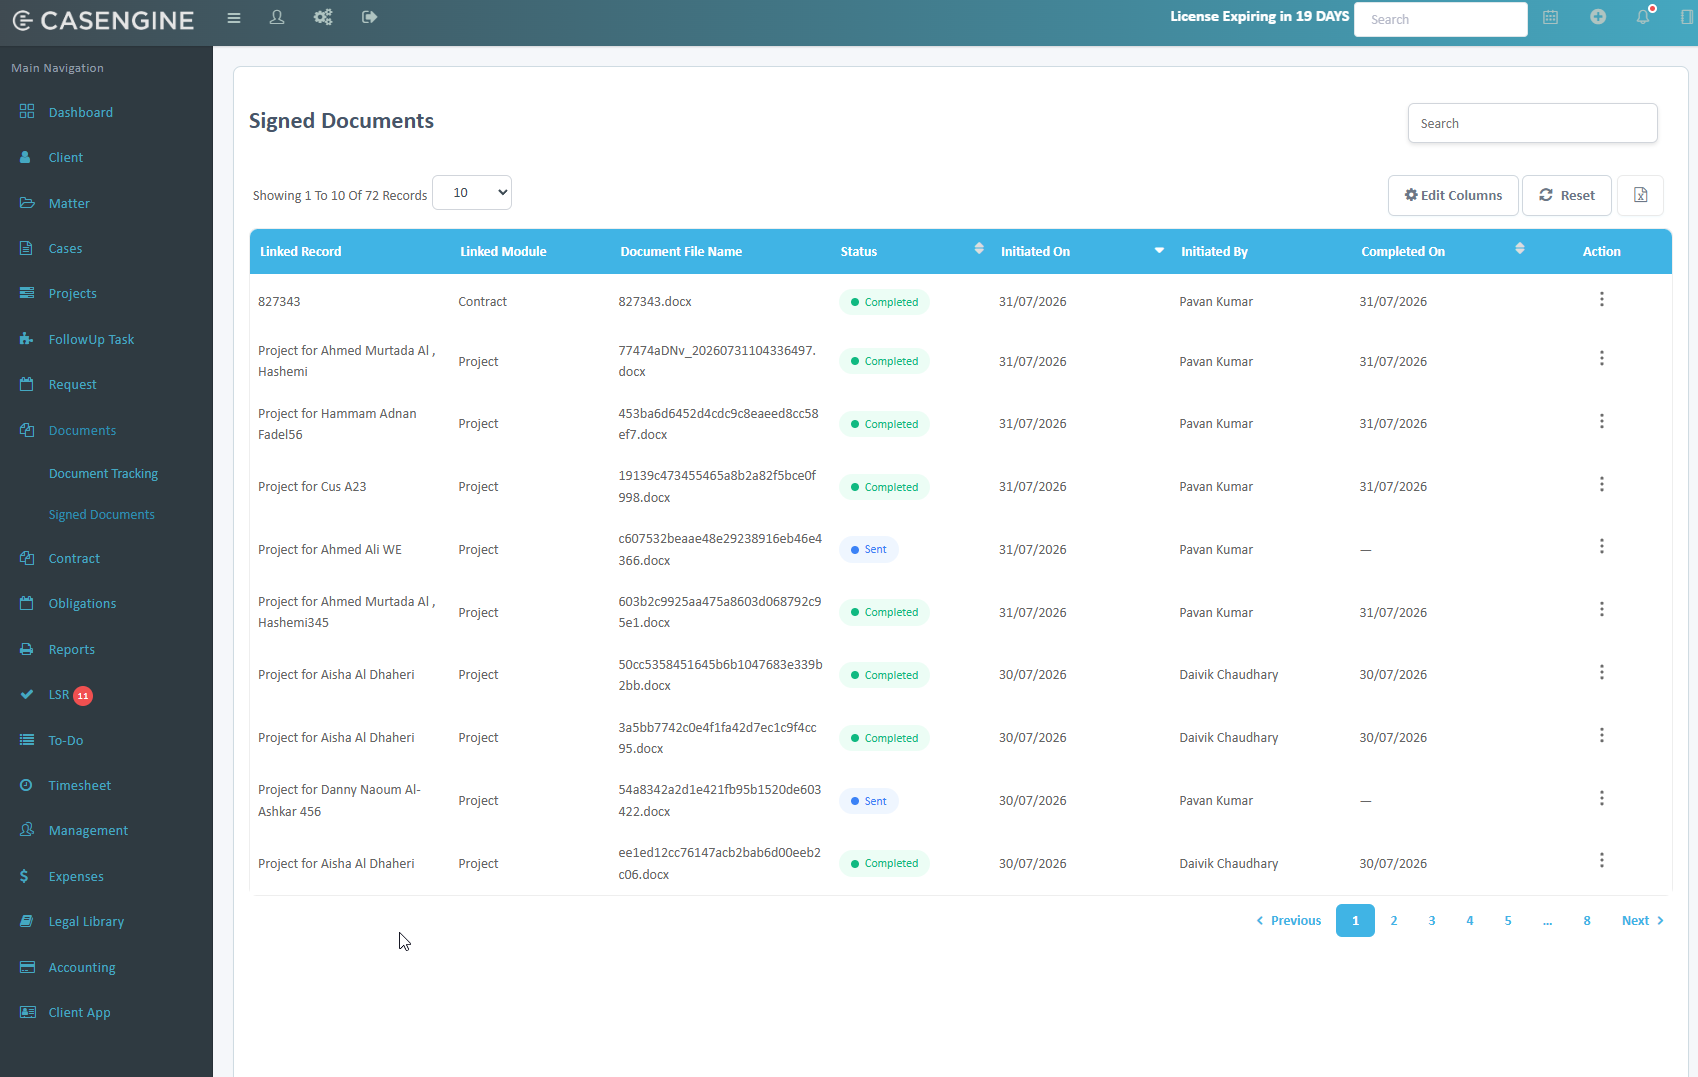
Navigate to Documents → Signed Documents from the left menu to track and manage all envelopes sent through DocuSign across the system.
The grid displays:
- Linked Record – the project or contract the document belongs to
- Linked Module – Project or Contract
- Document File Name
- Status – Sent, Completed, and other DocuSign envelope states
- Initiated On – date the envelope was sent
- Initiated By – user who initiated the request
- Completed On – date all signatures were collected, or a dash if pending
- Action – row menu with the available envelope operations
Grid controls include a search box, page size selector, Edit Columns, Reset, and an export option.
Available Actions
From the Action menu on each row:
- Remind – send a reminder email to signatories who have not yet signed
- Void – cancel the envelope; the document can no longer be signed
- View – open the envelope details and signing status
- Download – download the signed document once completed
Note: Remind and Void are available only while the envelope is in a pending state. Completed envelopes are read-only and can only be viewed or downloaded.
Usage Notes
- Cloud storage must be connected and the Project module toggle enabled before the Project Document section appears in project registration
- Only Word files (.docx) are supported for the project document
- The document source choice made at registration is final; selecting Skip permanently prevents a document from being linked to that project
- Client contacts granted access receive the document through email notification; access can be revoked at any time from the Manage Access panel
- Signature management is handled entirely through the Signed Documents page, which consolidates envelopes from both the Project and Contract modules
References
- App Settings → Integrations – provider connection and Cloud Storage Modules configuration
- Contracts Module – source records for the Link Contract option
- System Users Master – internal users available in Manage Access
- Client Master – client contacts available in Manage Access
- Documents → Signed Documents – DocuSign envelope tracking and management
Was this article helpful?
That’s Great!
Thank you for your feedback
Sorry! We couldn't be helpful
Thank you for your feedback
Feedback sent
We appreciate your effort and will try to fix the article