Custom Fields (Matter) Documentation
Introduction
Custom Fields allow firms to capture additional matter information that is not covered by the standard matter fields. Fields are defined once in Settings and then appear automatically in the Matter form and Matter view, in the order configured. Values entered against a matter are also visible from any case registered under that matter, so matter-level engagement details remain available in the case context without re-entry.
Each custom field is bilingual, with separate English and Arabic labels.
Accessing Custom Fields
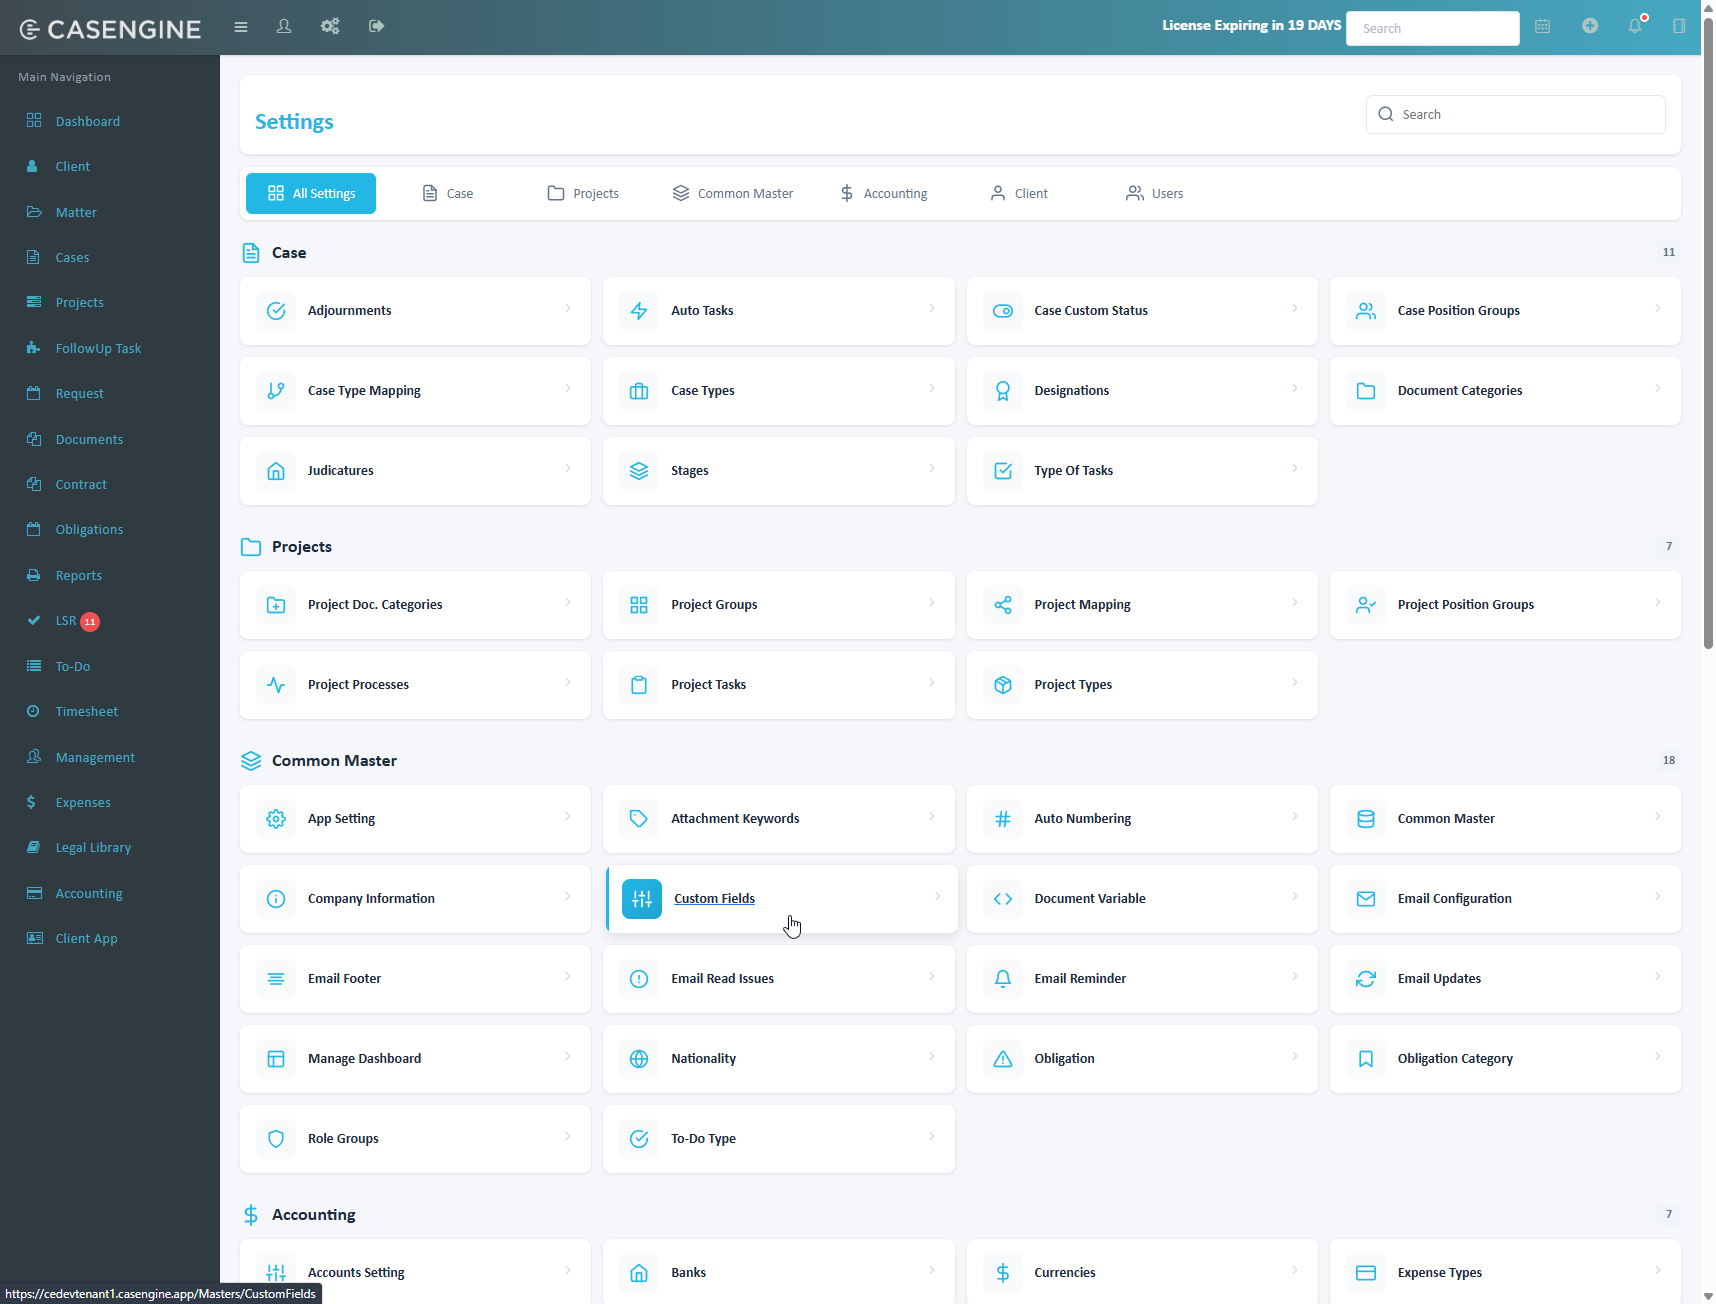
- Navigate to the Settings section by clicking the settings icon in the header bar on the left side
- In the settings search box, type Custom Fields
- Click on Custom Fields from the filtered results
Managing Existing Custom Fields
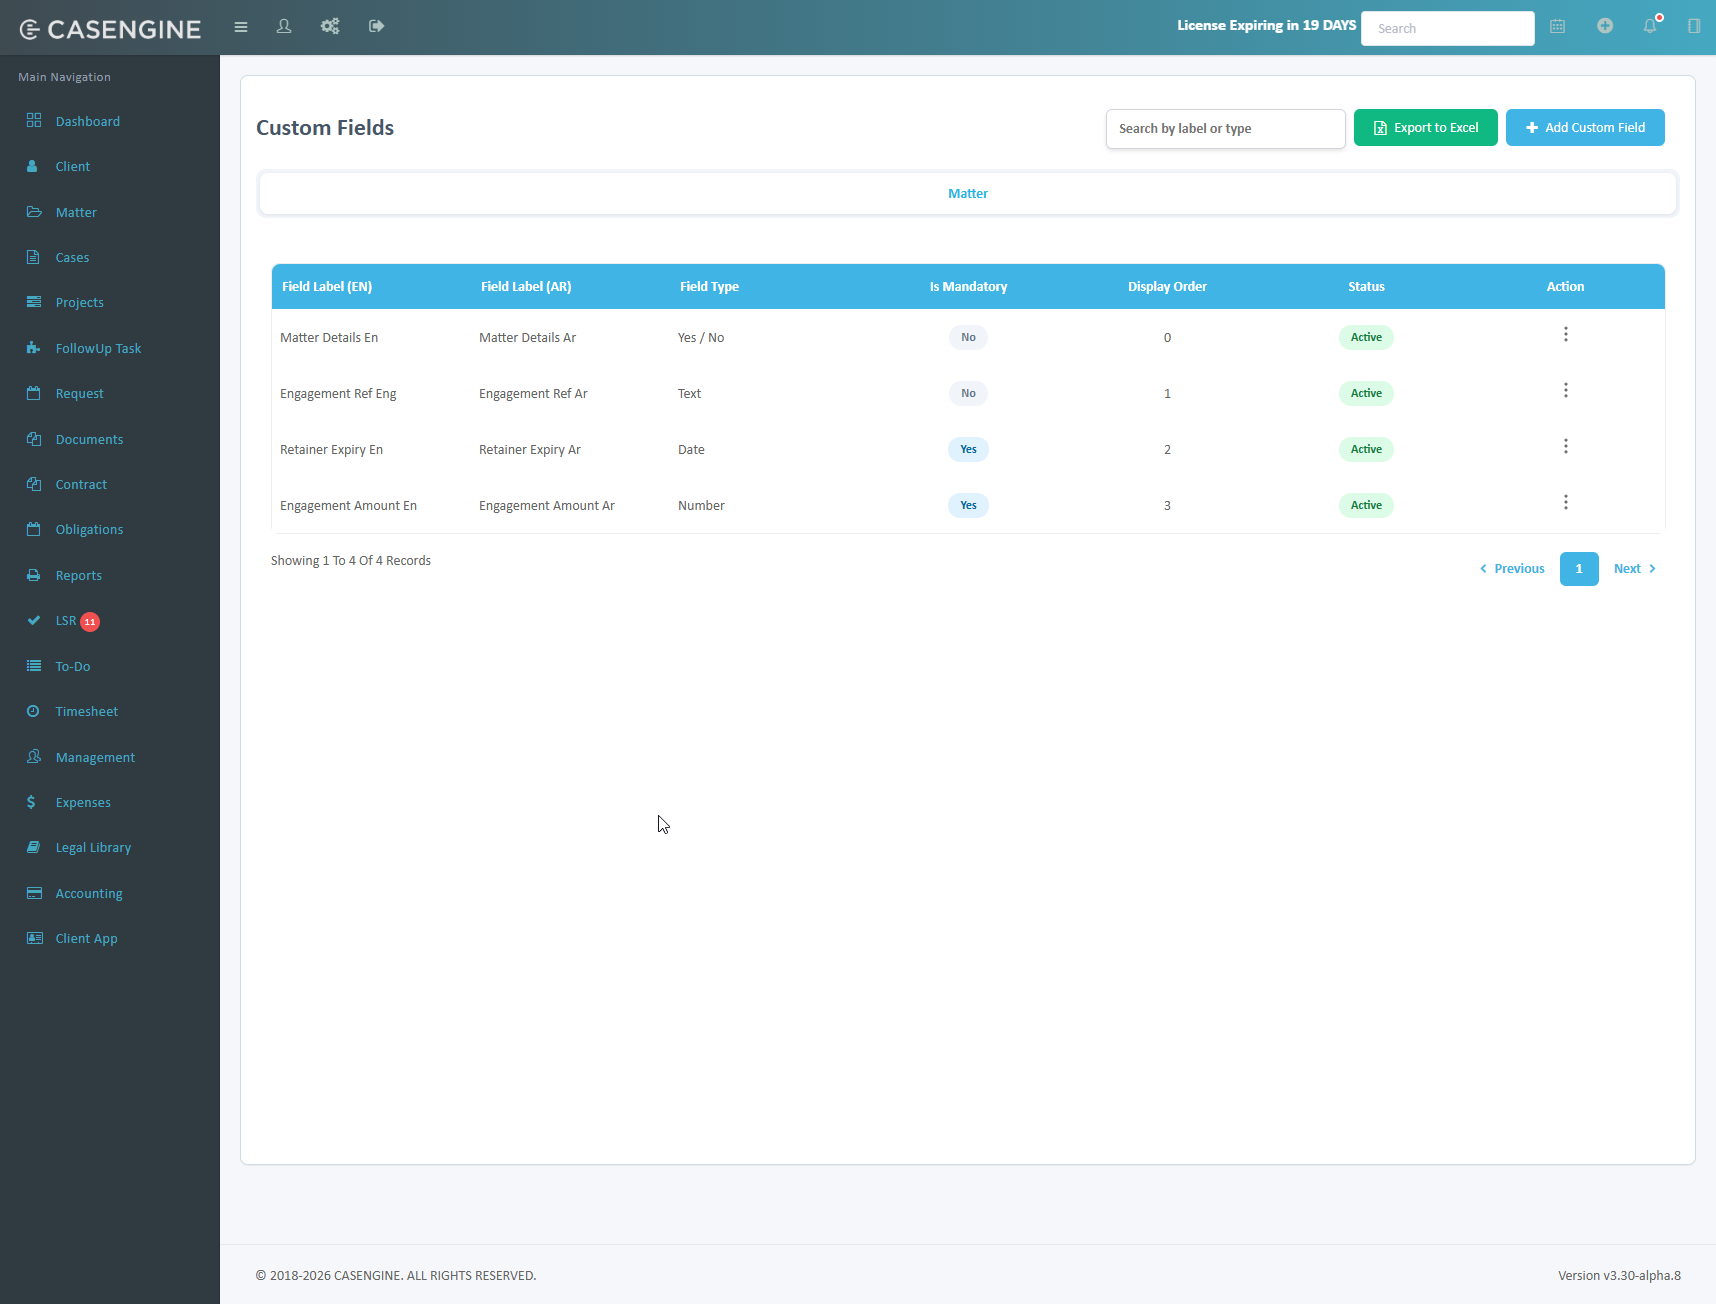
The Custom Fields page displays all configured fields for the Matter module in a table with:
- Field Label (EN) – field label shown in the English interface
- Field Label (AR) – field label shown in the Arabic interface
- Field Type – Text, Number, Date, or Yes / No
- Is Mandatory – Yes / No indicator
- Display Order – position of the field in the matter form
- Status – Active or Inactive
- Action – row menu with Edit and status options
Page controls:
- Search by label or type – filter the grid across field labels and field types
- Export to Excel – download the current field configuration
- Add Custom Field – open the panel to create a new field
- Pagination controls with record count at the bottom of the grid
Note: There is no limit on the number of custom fields that can be created for the matter module.
Adding a New Custom Field
- Click Add Custom Field in the top right corner
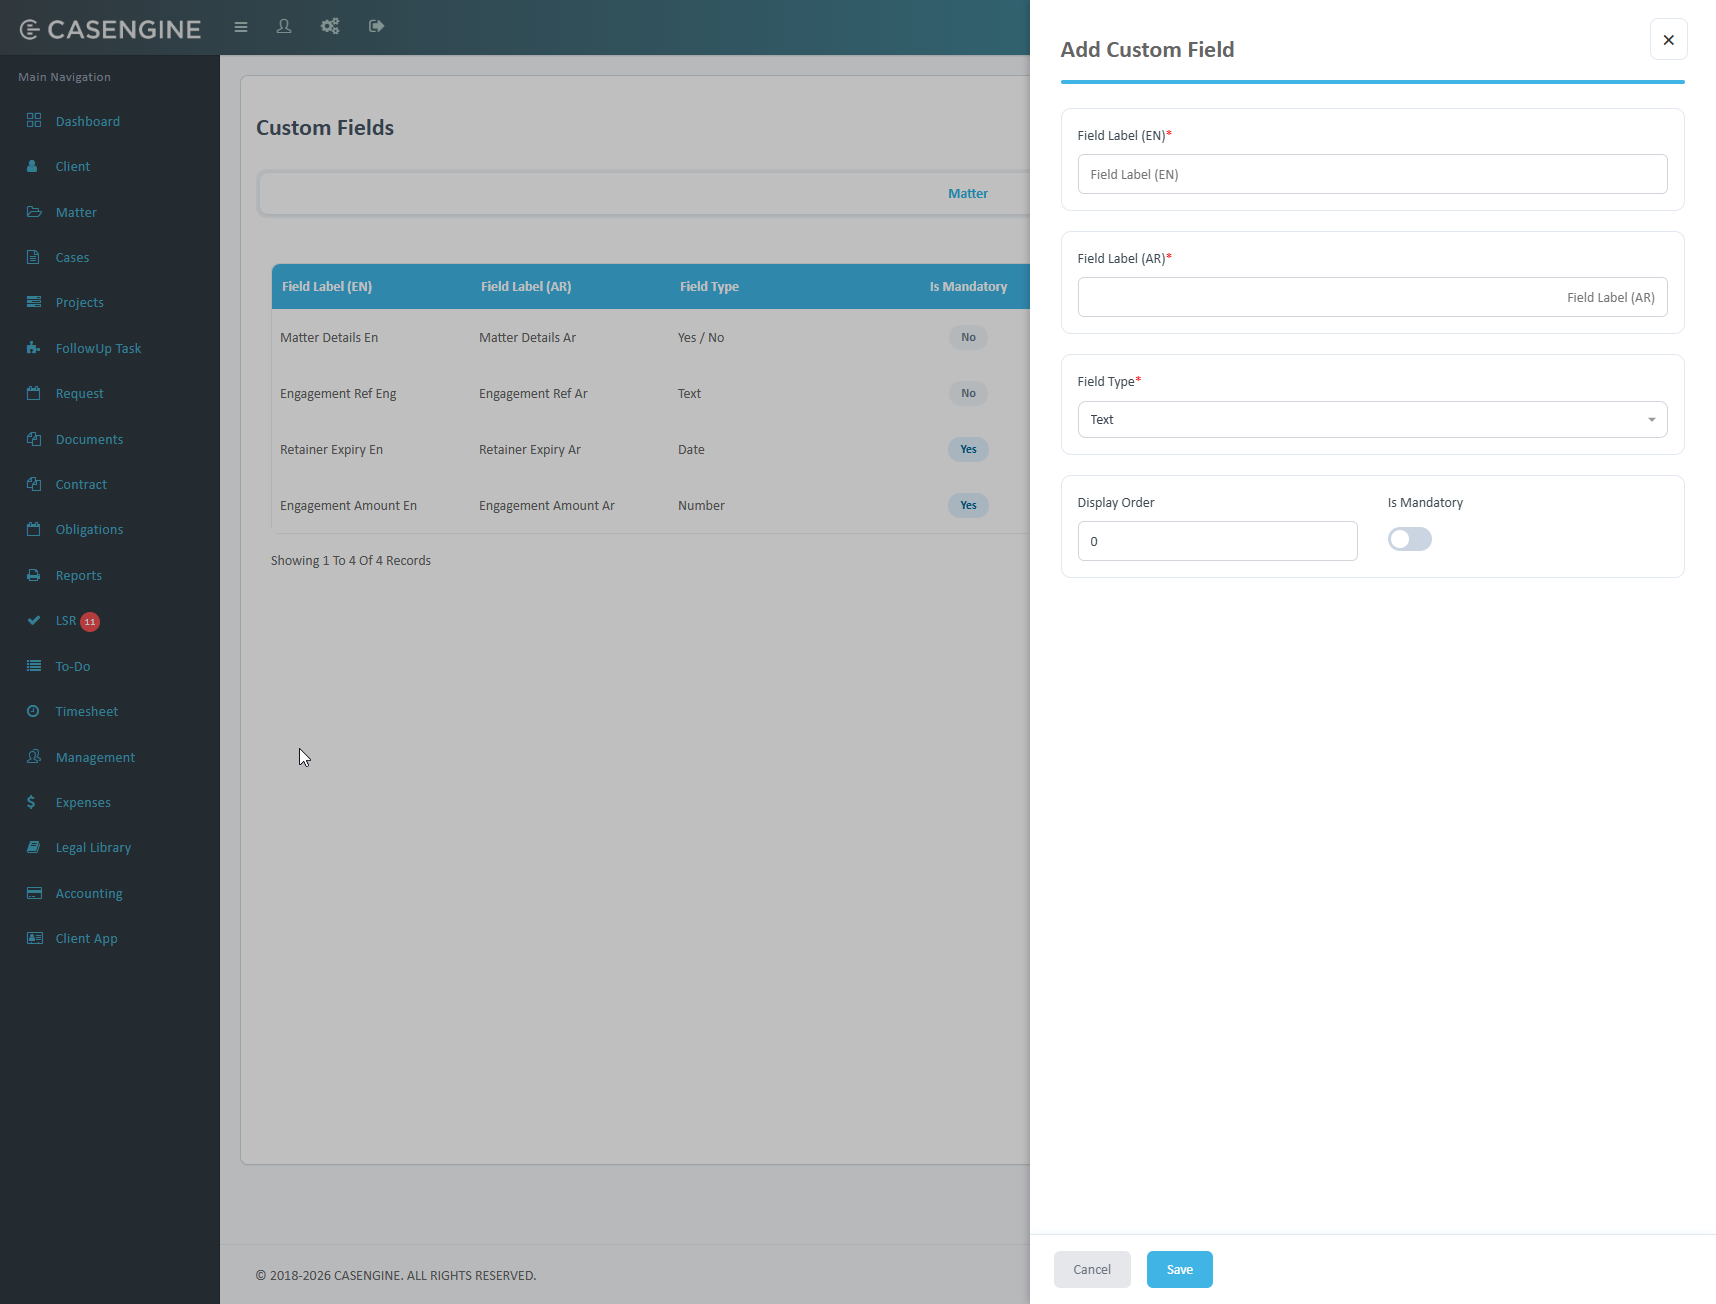
- The Add Custom Field side panel opens
- Enter the following:
- Field Label (EN): Enter the field label in English (required)
- Field Label (AR): Enter the field label in Arabic (required)
- Field Type: Select the type of field from the dropdown (required)
- Display Order: Enter a numeric value that controls the position of the field in the matter form. Lower numbers appear first
- Is Mandatory: Toggle on to make the field compulsory during matter creation and update
- Click Save to create the field, or Cancel to discard
Available Field Types
| Field Type | Input Behavior | Example |
|---|---|---|
| Text | Single-line free text entry | Engagement Ref |
| Number | Numeric / amount entry only | Engagement Amount |
| Date | Date picker, following the system date format | Retainer Expiry |
| Yes / No | Boolean toggle rendered as a Yes / No value | Matter Details |
Note: The Is Mandatory setting does not apply to Yes / No fields. A boolean field always holds a value, so it cannot be left blank and is never enforced as mandatory.
Display Order Behavior
The Display Order value determines the sequence in which custom fields are rendered in the matter form and the matter view. Fields are sorted ascending by this value.
- Order values start from 0
- If two fields share the same order value, they are displayed in the order they were created
- Changing the order value on an existing field immediately updates the field position across the matter form and matter view
Editing and Deactivating Custom Fields
From the Action menu on any row:
- Edit – reopen the field panel to update labels, field type, display order, or the mandatory setting
- Change Status – set the field to Active or Inactive
Note: Inactive fields are hidden from the matter form and matter view. Values already captured against existing matters are retained and become visible again if the field is reactivated.
Custom Fields in the Matter View
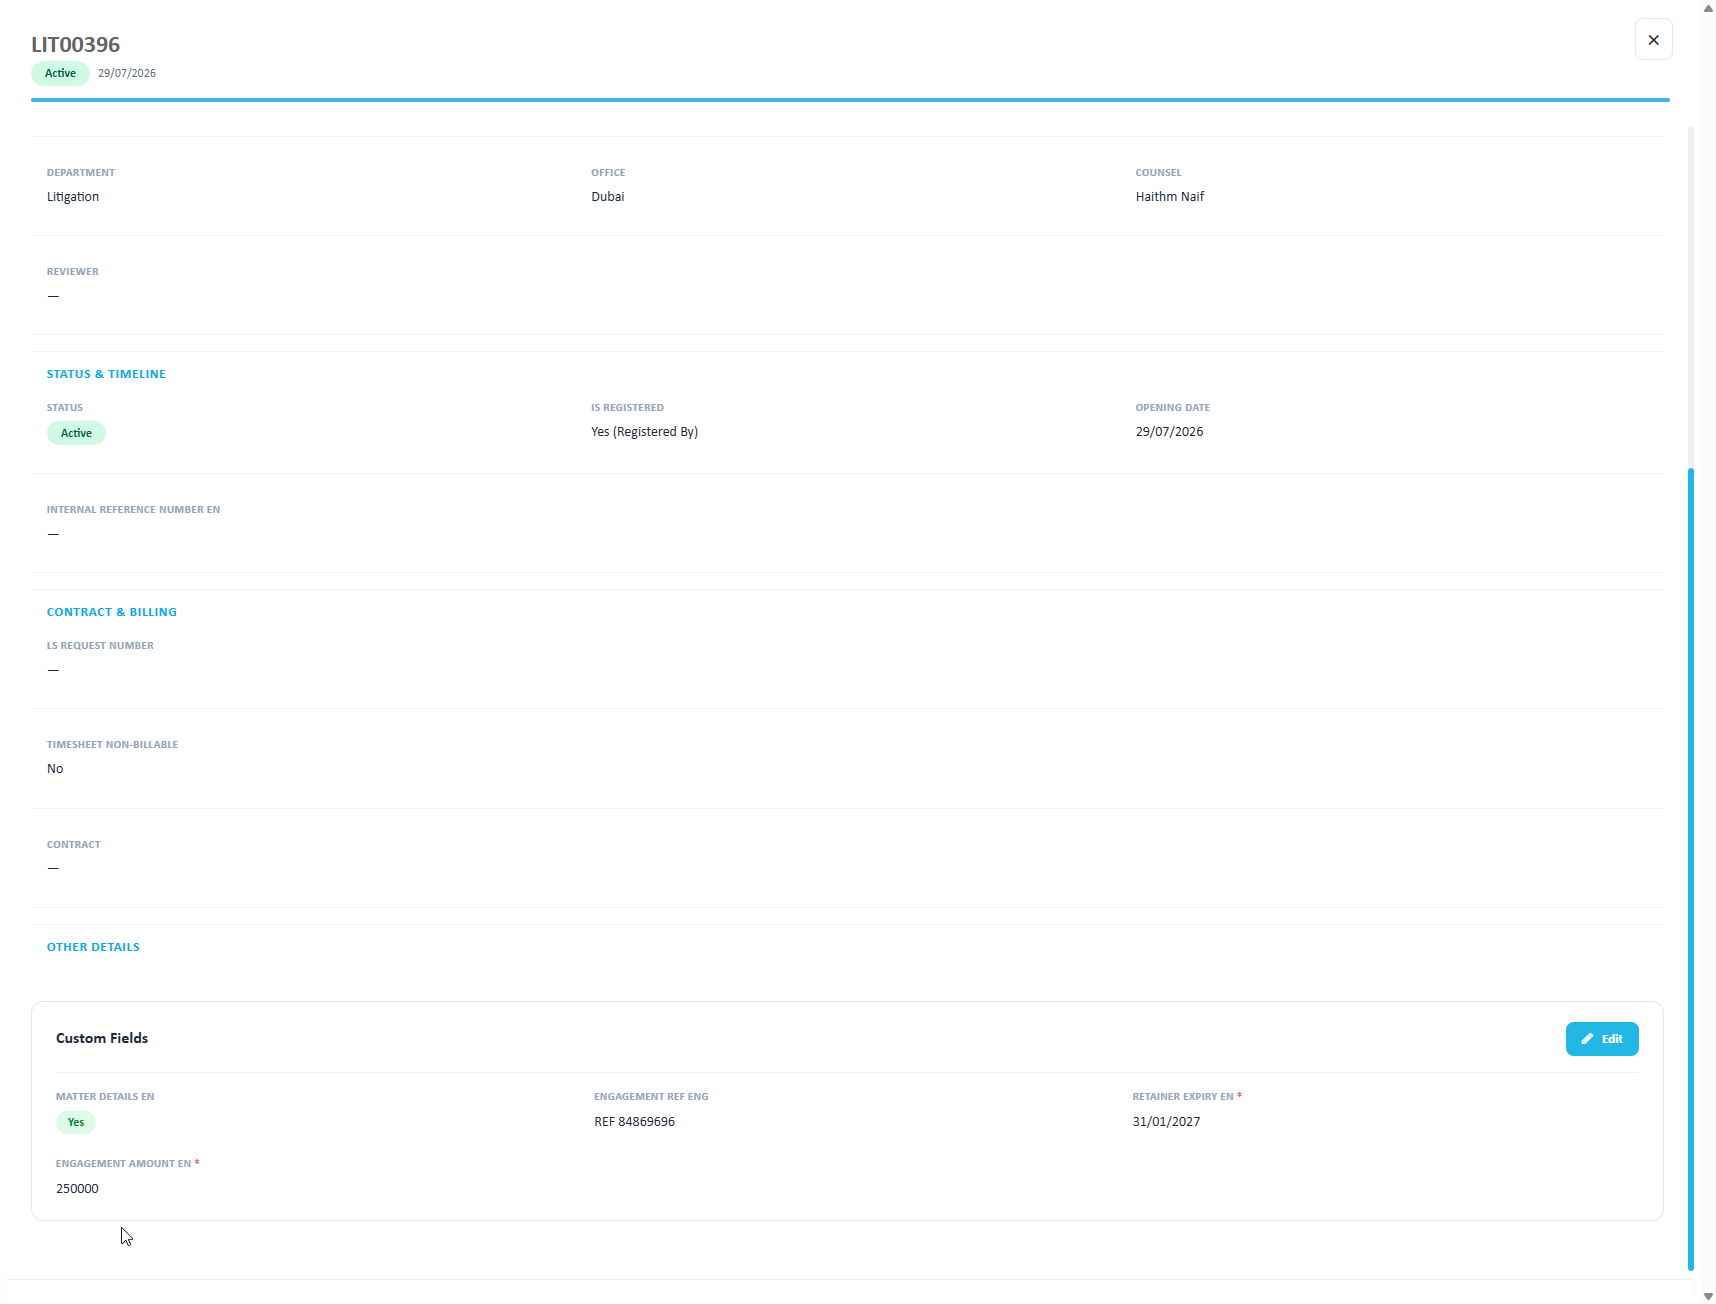
Once configured, the custom fields appear in the matter view under the Other Details section, inside a Custom Fields card.
The card displays each field with its label and captured value, arranged according to the configured display order. Mandatory fields are marked with a red asterisk. Yes / No fields are shown as a status badge, dates in the system date format, and empty values as a dash.
To update the values:
- Click Edit on the Custom Fields card
- Update the field values as required
- Save the section
Note: Mandatory custom fields must be completed before the section can be saved.
Custom Fields in the Case View
Custom field values captured at matter level are available from every case registered under that matter, as read-only reference information.
To view them:
- Open the case from the Cases module
- Click the three-dot menu in the case header
- Select Matter Details
- The Matter Details panel opens, displaying the matter attributes followed by a Custom Details section listing all matter custom fields with their captured values
- Click Close to exit the panel
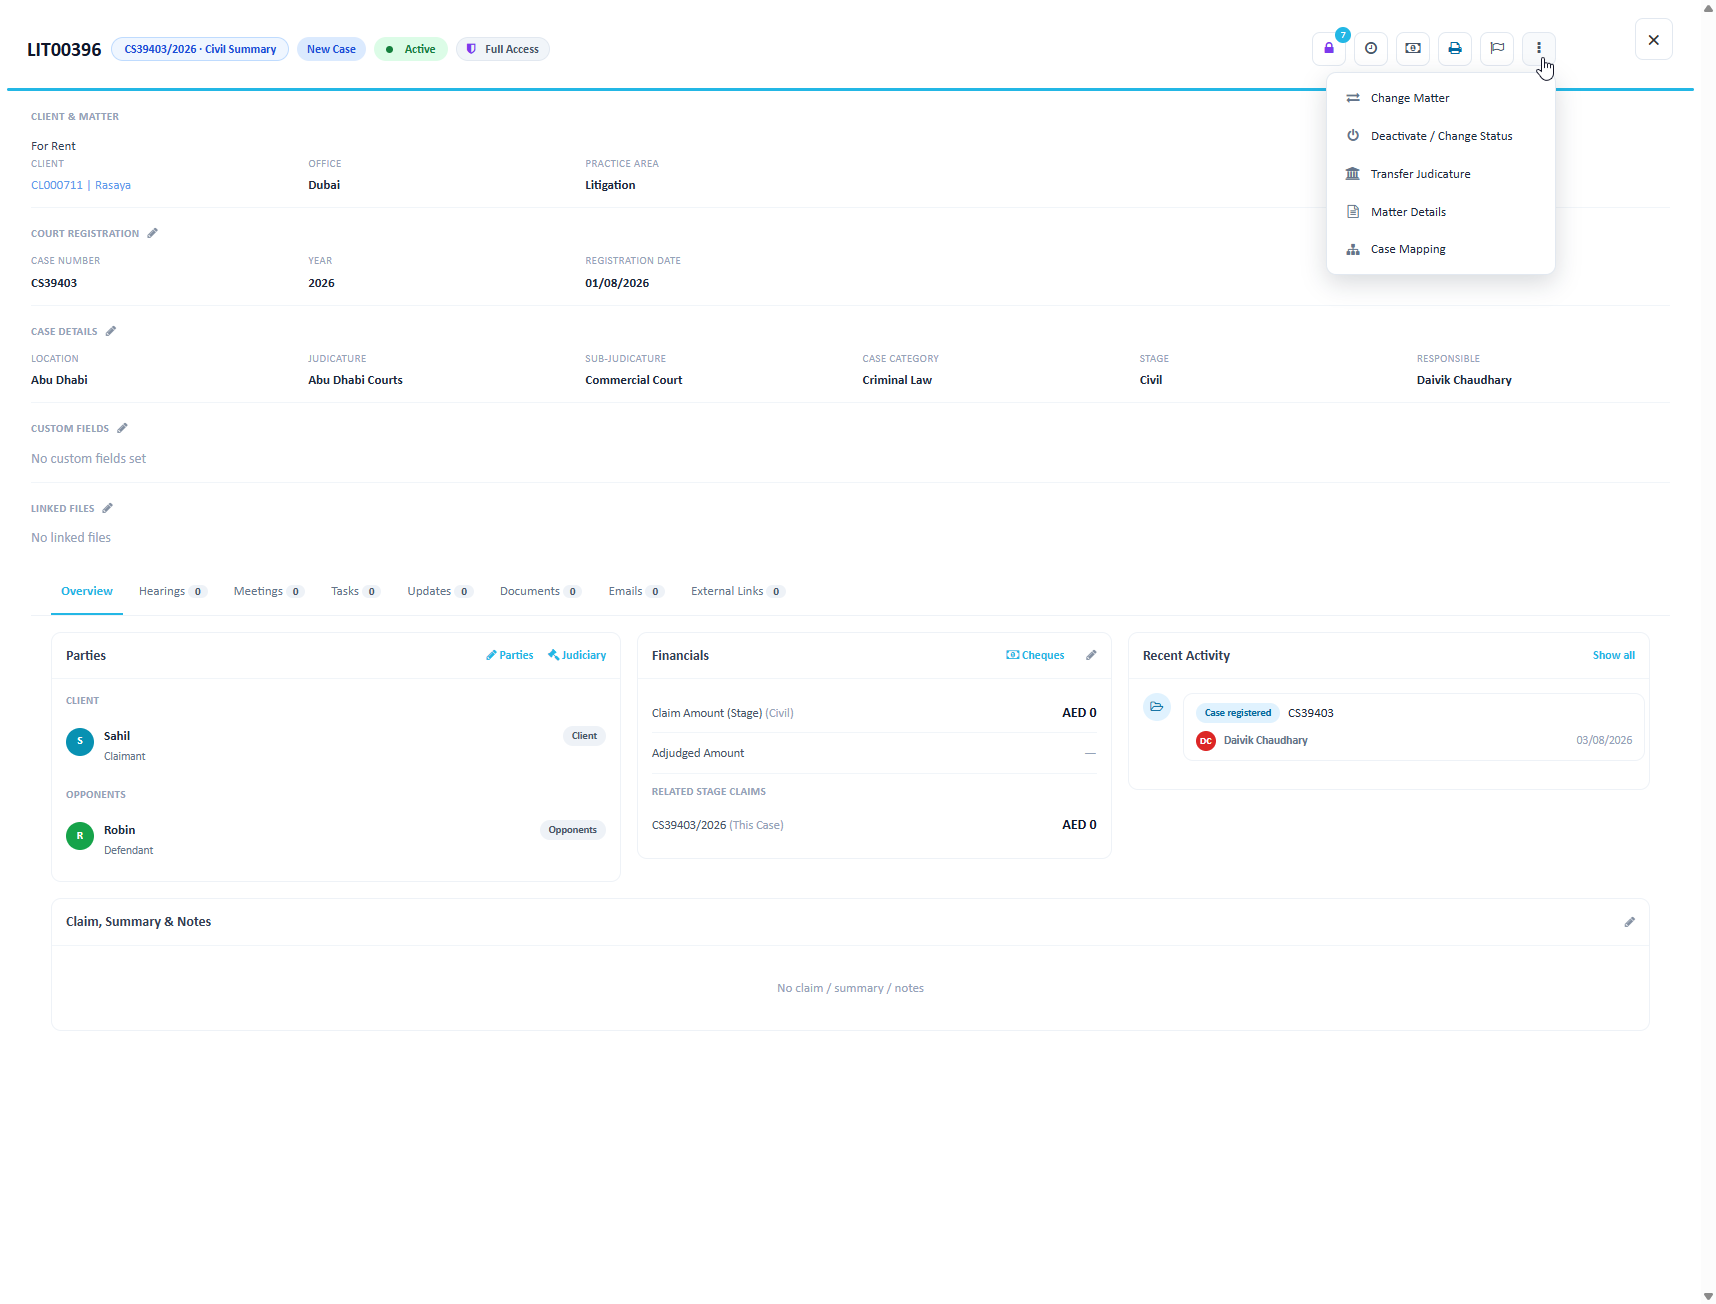
Case view three-dot menu showing the Matter Details option
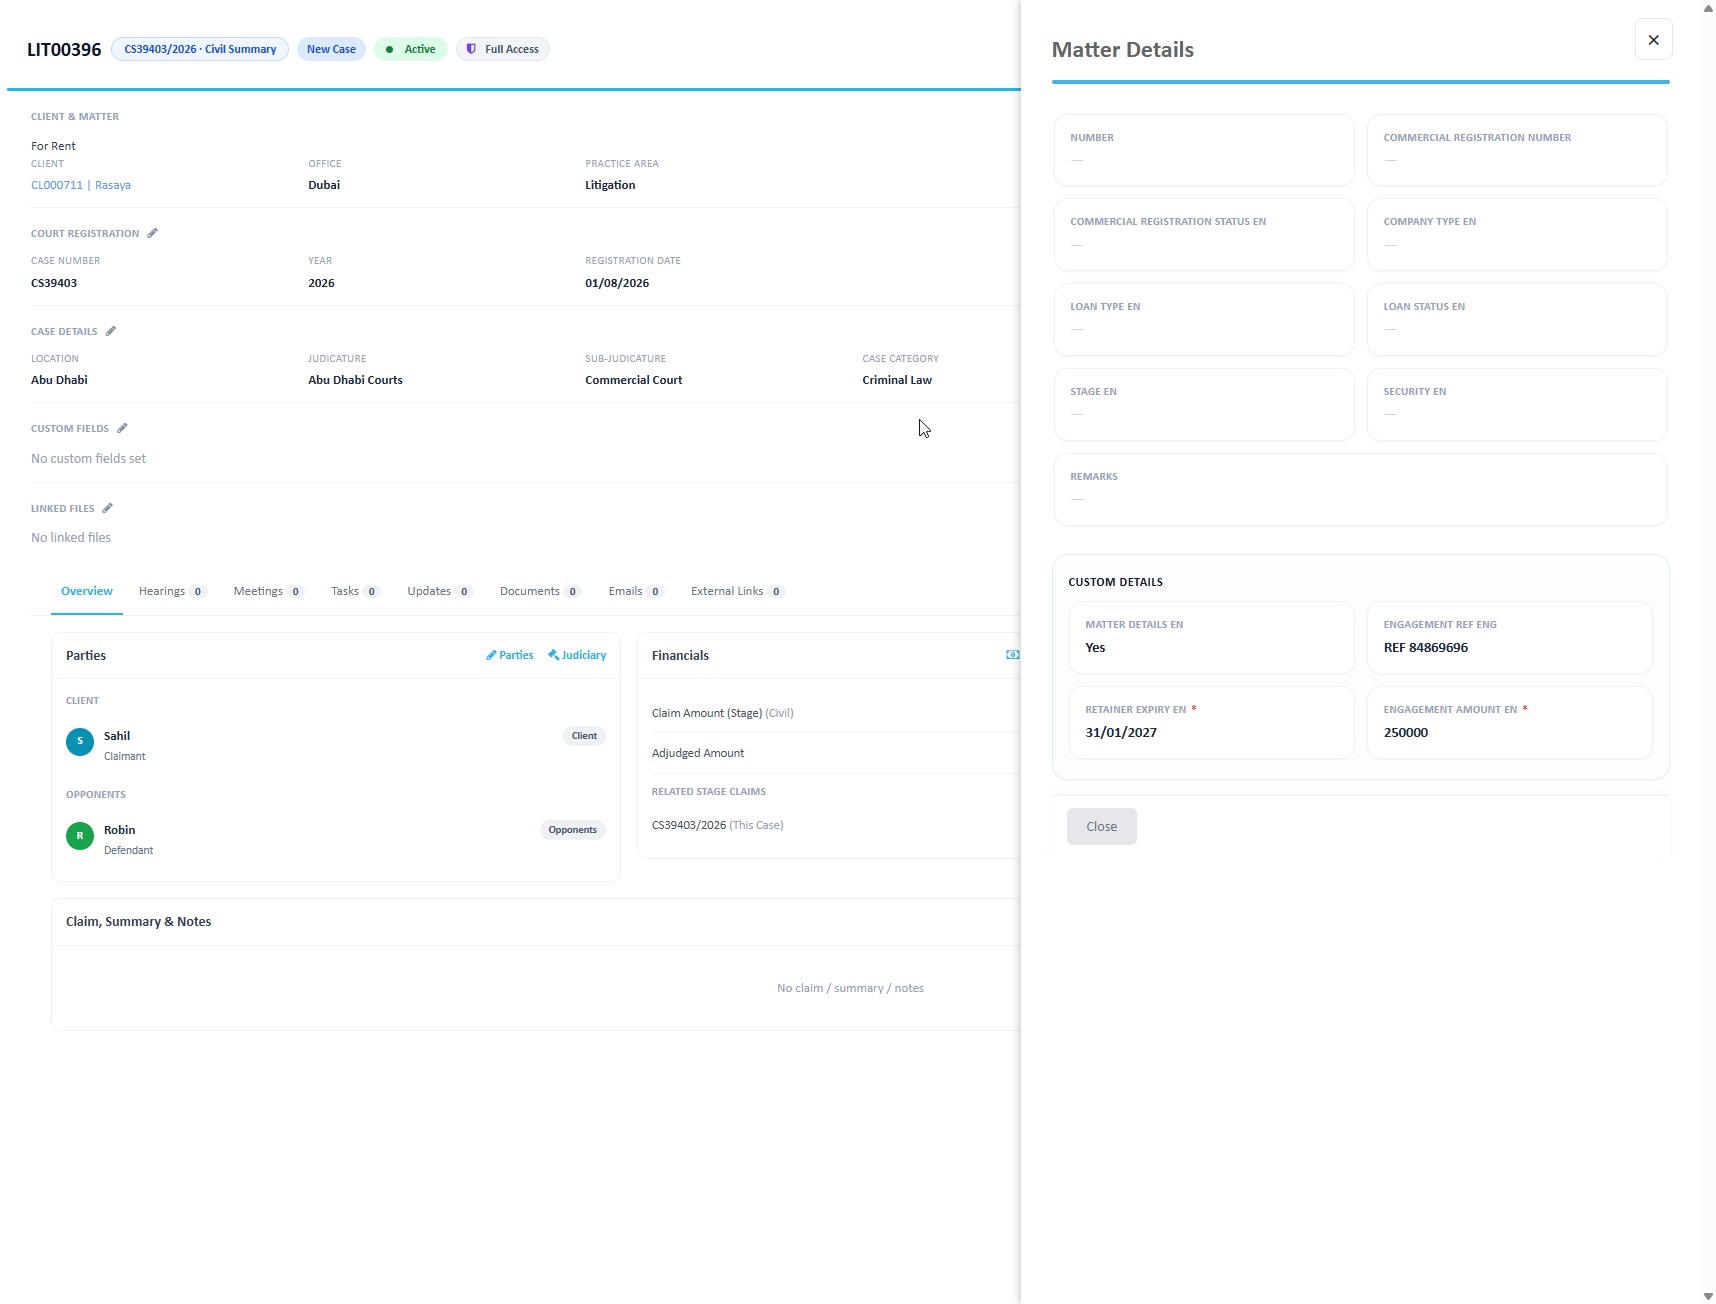
Matter Details panel showing the Custom Details section with matter custom field values
Important: Custom field values shown in the case view are read-only. They can only be edited from the matter view. This is distinct from the Custom Fields section on the case overview, which holds case-level values configured separately.
Usage Notes
- Both English and Arabic labels are mandatory; the label displayed follows the interface language selected by the user
- Field type cannot be meaningfully changed once values have been captured, as existing values may not be compatible with the new type. Create a new field instead where the data type needs to change
- Mandatory validation applies to matter creation and to updating the Custom Fields section in the matter view
- The Is Mandatory setting has no effect on Yes / No fields
- Use Export to Excel to share the current field configuration for review or documentation purposes
References
- Matter Module – where custom field values are captured and edited
- Cases Module – matter custom field values are surfaced read-only through the Matter Details panel
- Common Master – separate configuration for list, text and date master values used elsewhere in the system
Was this article helpful?
That’s Great!
Thank you for your feedback
Sorry! We couldn't be helpful
Thank you for your feedback
Feedback sent
We appreciate your effort and will try to fix the article