Timesheet Module Documentation
Timesheet Module
The Timesheet module is used to record and manage the time spent by users (lawyers, executives and other timekeepers) on matters, cases, projects and leads throughout the system for accurate billing, productivity tracking and reporting. Timesheets can be logged manually with start/end times or captured live using the built-in timer, with full support for billable and non-billable hour classification, role-based rate management and bilingual descriptions. The module helps standardize time recording and ensures every billable minute is captured systematically across the platform.
Prerequisites — Setting Up a User as a Timekeeper
Before a user can create timesheet entries, they must be configured as a Timekeeper with an applicable hourly rate.
- Navigate to the Settings section by clicking the settings icon in the header bar on the left side
- Under the Users section, click on User Management
- Locate the user and click the Edit action
- Open the Permissions tab on the left side panel
- Under the Time & Billing section, enable the Time Keeper toggle
- The system will auto-populate the following from the user's office configuration:
- Working Hours (read-only)
- Billable Hours (read-only)
- Non-Billable Hours (read-only)
- Enter the Hourly Rate in the user's currency (e.g., BHD 500.00) — this rate will be used as the default in timesheet entries created by this user
- (Optional) Under the Approval Roles section, enable Timesheet Approver if this user should approve timesheets for other users; once enabled, select the users whose timesheets they can approve
- Click Submit to save
Edit User overlay showing the Time Keeper toggle and Hourly Rate configuration under Time & Billing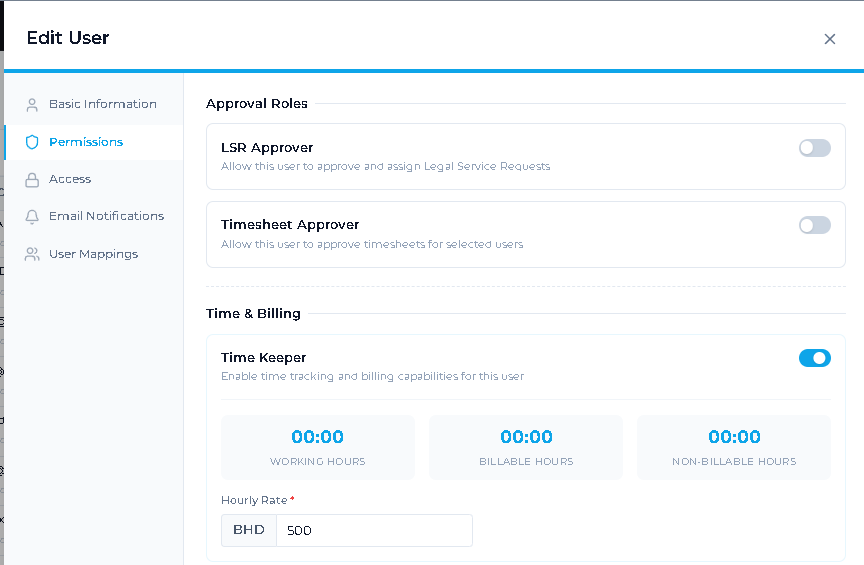
Reference:
- Working/Billable/Non-Billable hours are inherited from the user's assigned office in the Office Master
- Currency is inherited from the Currency Master
Accessing the Timesheet Module
There are multiple entry points for creating and managing timesheet entries.
Quick Entry from the Header
- Click the + (plus) icon in the top header bar
- From the quick action menu, click New Timesheet Entry
- The New Timesheet Entry overlay will open
Quick action menu in the header showing New Timesheet Entry option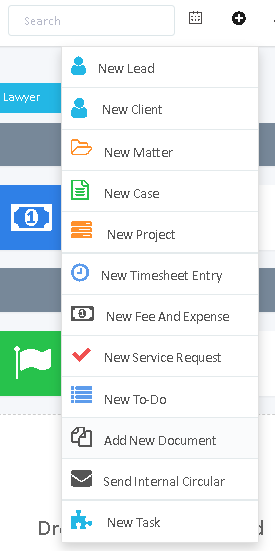
Existing Timesheets Page
- Navigate to the Time Sheets menu from the main navigation
- Click on Existing Time Sheets
- From here you can view, filter, edit, delete and create new timesheet entries
From a Case or Project View
- Open any case or project from its respective module
- In the case/project header, click the clock icon displayed in the action icons row
- The New Timesheet Entry overlay will open with the case or project pre-selected
Creating a New Timesheet Entry
On clicking New Timesheet Entry from any of the above entry points, the timesheet creation overlay opens.
Related To Configuration
Select what this timesheet entry should be linked to using radio button options:
- Matter: Link the entry to a client matter (default selection)
- Case: Link the entry to a case
- Projects: Link the entry to a project
- Lead: Link the entry to a lead in the pre-engagement stage
Based on the selection, the corresponding lookup field appears (Matter / Case / Project / Lead).
Basic Information
- Matter / Case / Project / Lead: Select the relevant record from the dropdown using single selection (the label changes based on the Related To option selected above)
- Type: Select the time entry type from the dropdown:
- Billable: Time will be billed to the client
- Non-Billable: Time will not be billed to the client (e.g., internal admin, training)
- Date: Select the date of the work using the date picker (defaults to today's date; back-dating may be restricted based on Accounts Settings)
Time Capture
There are two ways to capture time — entering it manually or using the timer.
Manual Entry:
- Select Start Time: Pick the time when the work began
- Select End Time: Pick the time when the work ended
- Hours (HH:MM): Enter the billable hours to charge the client
- Actual Hours (HH:MM): Enter the hours actually spent on the work
Note: Hours and Actual Hours are kept separate to allow billing fewer hours than were actually worked (e.g., if a portion of time is written off as a courtesy or efficiency adjustment).
Timer Entry:
- Click the Start Timer button on the top right of the form
- The timer begins recording in real time
- The entry is saved as a "Recording" entry that the user can return to later
- Continue with other work while the timer runs in the background
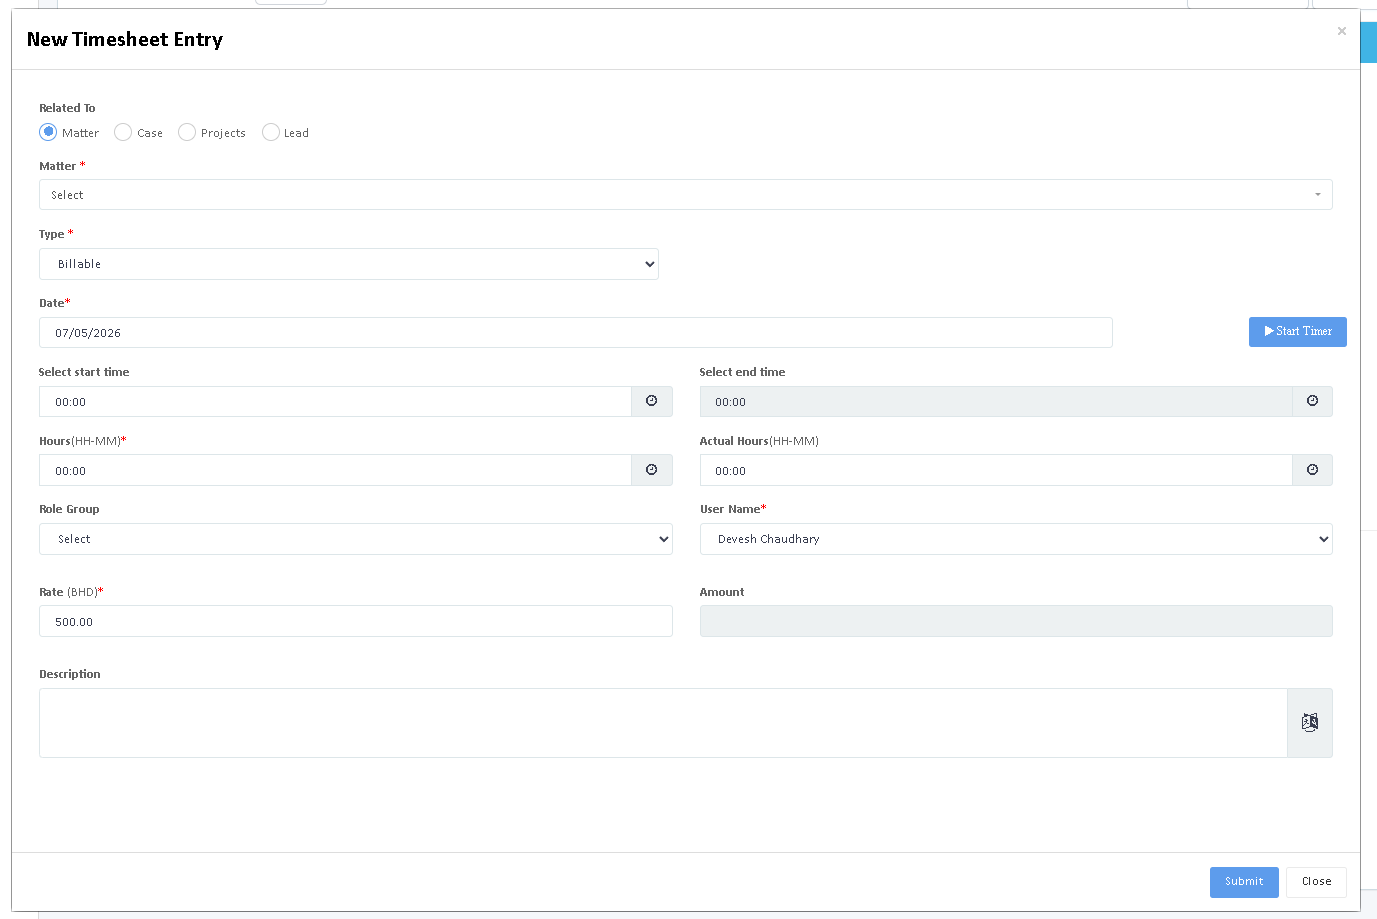 New Timesheet Entry form showing Related To selection, Matter, Type, Date and time fields
User & Rate Information
- Role Group: Select the role group from the dropdown — this drives the hourly rate when role-based billing is configured
- User Name: Defaults to the logged-in user (single selection); admins/timesheet approvers may be able to log on behalf of other users
- Rate: Auto-populated from the user's hourly rate or role group rate; manual editing may be restricted based on Accounts Settings
- Amount: Auto-calculated as Hours × Rate (read-only)
Description
- Description: Enter a free-text description of the work performed
- Click the translation icon at the right of the description box to add the Arabic translation
Submitting the Entry
- Click Submit to save the timesheet entry
- Click Close to discard the entry without saving
Managing the Recording Timer
When a timer is started, the system tracks it in the header for easy access.
- A Recording Time button appears in the top header bar (highlighted in red)
- Click the Recording Time button to view all currently running timers in a dropdown panel
- The panel displays each running timer with:
- Matter Number: The linked matter
- Case/Project: The linked case or project (if any)
- Duration: The current running time
- Status: Recording badge (green)
- Action: Pause, Stop, Edit and Stop-and-Edit-Description buttons
You can:
- Pause a timer using the pause icon — pauses recording without finalizing the entry
- Stop a timer using the stop icon — finalizes the entry with the recorded duration
- Edit a timer entry using the edit icon — opens the full timesheet form to update all fields
- Stop and edit description only using the dedicated icon — stops the timer and lets the user quickly add a description without re-entering other fields
- Stop All using the Stop All button at the top of the panel — stops every running timer at once
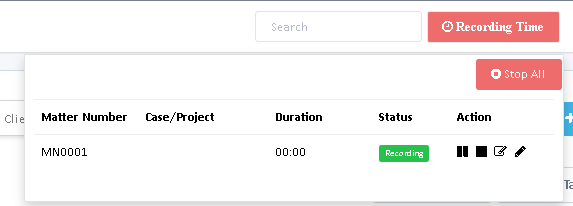 Recording Time panel in the header showing running timers with action controls
Reference:
- Timers left running overnight are stopped automatically at midnight.
Managing Existing Timesheets
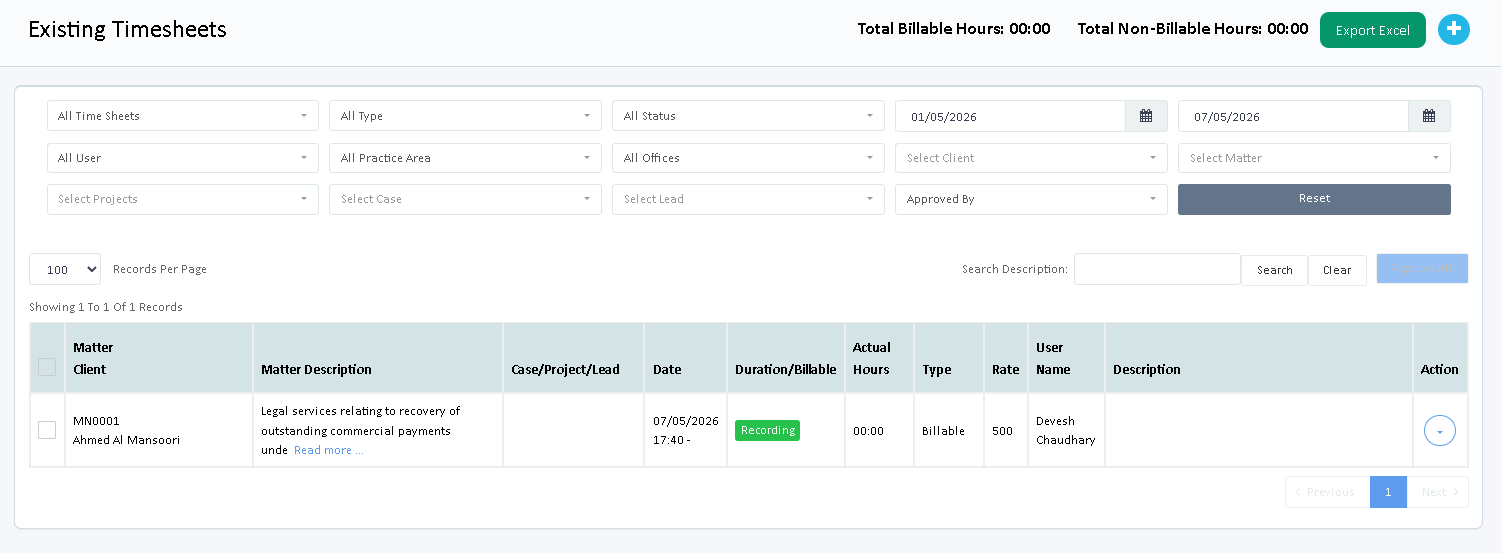
The Existing Timesheets page is the central place to view, search, filter, edit and delete all timesheet entries.
Page Header
The page header displays:
- Total Billable Hours: Sum of billable hours across all filtered entries
- Total Non-Billable Hours: Sum of non-billable hours across all filtered entries
- Export Excel button: Export the filtered list to an Excel file
- + (Plus) icon: Opens the New Timesheet Entry overlay
Was this article helpful?
That’s Great!
Thank you for your feedback
Sorry! We couldn't be helpful
Thank you for your feedback
Feedback sent
We appreciate your effort and will try to fix the article